自動デプロイしてみた。(CI/CDの第一歩 / Github Action)
背景
毎回webサーバで git pull すんのめんどくさい
やること
Github Action使って、pushされたらサーバで自動デプロイ
やったこと
鍵の作成
これは今までやっていたが今回 パスフレーズなし にすることがポイントだった。デプロイ先でパスワードの入力待ちになってしまうから。 ※ ただ、力技な気がするので詳しい人には聞きたい。
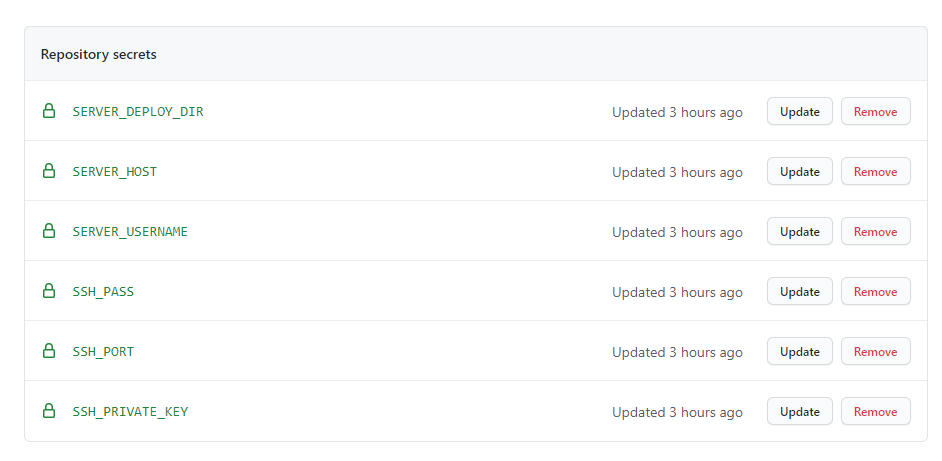
環境変数の設定
リポジトリの [Settings] -> [Secrets] でAction secrets を設定する。これを「環境変数」って言い方したけどgithub actionでの設定ファイルに使うよ。
New Secret とすると Name と Value を入力できる。
| Name | 記述内容 |
|---|---|
| SERVER_USERNAME | デプロイサーバへssh接続する際のユーザ名 |
| SERVER_HOST | サーバのホスト |
| SSH_PORT | 接続サーバのポート。sshなのでデフォは22だけど、変えてる可能性は十分ある。 |
| SSH_PRIVATE_KEY | 秘密鍵。Githubの秘密鍵じゃないよ。サーバに対しての秘密鍵だよ。 |
| SSH_PASS | 秘密鍵のパスワード |
| SERVER_DEPLOY_DIR | デプロイするパス |
私の設定の最終形態
設定ファイル
Github上でも作れますが、なんとなく私は自分のローカルで作ってpushしたかったのでおとなしく /.github/workflows/deploy.yml を作成。ファイル名は何でも良いらしい。ディレクトリで自動識別してくれる模様。
name: CI

on:
  push:
    branches:
      - develop

jobs:
  build:
    runs-on: ubuntu-latest

    steps:
      - name: Deploy
        uses: appleboy/ssh-action@master
        with:
          host: ${{ secrets.SERVER_HOST }}
          username: ${{ secrets.SERVER_USERNAME }}
          port: ${{ secrets.SSH_PORT }}
          key: ${{ secrets.SSH_PRIVATE_KEY }}
          passphrase: ${{ secrets.SSH_PASS }}
          script: |
            cd ${{ secrets.SERVER_DEPLOY_DIR }}
            git pull origin develop
引っかかりポイント
ssh-add で毎回鍵を登録しないといけなかったが、鍵を作るときのパスフレーズを空にすればsshへの再登録は不要だった。
ただ、念の為
# ~/.bashrc

eval "$(ssh-agent -s)"
ssh-add
としておいた。ymlにも書いたから多分要らない。
参考
Laravel 私なりの自作ファサードの理解
背景
Slackで通知するにあたって、Laravel6でファサード作りました。
ここでまとめること
ファサード概要なので、ソースの細かい内容は割愛。
作ったファイルたち
# app\Facades\Slack.php

<?php

namespace App\Facades;

use Illuminate\Support\Facades\Facade;

class Slack extends Facade
{
    protected static function getFacadeAccessor()
    {
        return 'slack';
    }
}
# app\Providers\SlackServiceProvider.php

<?php

namespace App\Providers;

use Illuminate\Support\ServiceProvider;
use App\Services\SlackService;

class SlackServiceProvider extends ServiceProvider
{
    /**
     * Register services.
     *
     * @return void
     */
    public function register()
    {
        $this->app->bind('slack', SlackService::class);
    }

    /**
     * Bootstrap services.
     *
     * @return void
     */
    public function boot()
    {
        //
    }
}
# app\Services\SlackService.php

<?php

namespace App\Services;

use Illuminate\Notifications\Notifiable;
use App\Notifications\SlackNotification;

class SlackService
{
    use Notifiable;

    /**
     * 通知チャンネル情報
     *
     * @var array
     */
    protected $channel = null;

    /**
     * 通知チャンネルを指定
     *
     * @param array $channnel
     * @return this
     */
    public function channel($channel)
    {
        $this->channel = config('slack.channels.' . $channel);

        return $this;
    }

    /**
     * Exceptionエラーを通知する
     *
     * @param string $message
     * @return void
     */
    public function exceptAlert($message): void
    {
        $this->channel(config('slack.default'));
    }

    /**
     * 通知処理
     *
     * @param string $message
     * @return void
     */
    public function send($message = null)
    {
        if (!isset($this->channel)) {
            $this->channel(config('slack.default'));
        }

        $this->notify(new SlackNotification($this->channel, $message));
    }

    /**
     * Slack通知用URLを指定する
     *
     * @return string
     */
    protected function routeNotificationForSlack()
    {
        return config('slack.url');
    }
}
Facade を継承したクラスでは getFacadeAccessor でファサードの名称(おそらく一意)を決める
ServiceProviderを継承したクラスで、ファサードの名称とサービスをバインドする。
これでファサードの登録が完了かな。
このサービスの中で、今回だったらSlackスラック通知クラスを作成する。このサービスクラスはLaravelに依存しないクラスなので自由にできそうね。
参考
PHPのcURLでSSL問題が発生する場合の対処
事象
cURL error 60: SSL certificate problem: unable to get local issuer certificate (see http://curl.haxx.se/libcurl/c/libcurl-errors.html)
というException
条件
原因
証明書がない
対応
概要
証明書の場所
see http://curl.haxx.se/libcurl/c/libcurl-errors.html と丁寧に書いてあるので以下公式サイトへ。
curl.se
- ナビバーの [Documentation] をマウスオーバーして [CA bundle]
- ナビバーの [Documentation] -> [Protocols] -> [CA bundled extracted]
上記どちらかで遷移したページの [cacert.pem] をクリックしてDL
面倒なら これポチってDL
http://curl.haxx.se/ca/cacert.pem
証明書設定
php.iniに書く。php.iniどこだ?ってなったら php --ini 叩けば教えてくれる。
php.iniの中に
[curl]
; A default value for the CURLOPT_CAINFO option. This is required to be an
; absolute path.
; curl.cainfo =
となっている部分があるので、curl.cainfo = のコメントを外して 絶対パスでダウンロードしたパスを入れる。
注意
パス名をダブルクォーテーションで囲っている記事をよく見たので試した。 結果として、対話形式(Laravelでのtinker etc)での直接通信は可能だったが、アプリから呼んだ場合は本記事のエラーと同じになった。 なので、ダブルクォーテーション外そうね。 ※ パスにスペースがあったらどうするんだろう?詰むのかな。
最後に
以上で、無事通信完了。 今回はSlackのwebhookを試しました。
参考
2021/01/06 参考にしたメモ
Nuxt学ぶ上で、Vueの基礎ぐぐった
created,mounted
async,await
Vuexで状態を常駐させるために
moment を用いたタイムゾーンの変更
表題に関してはぐぐればいくらでも出てきます。
主にここを参考にしました。
ただ闇雲に moment-timezone をimportしただけだと
tz ってプロパティがないだの、
setDefaultって関数がないだのエラーを吐かれました。
落ち着いたかたちが
import * as moment from "moment-timezone";
require('moment-timezone')
moment.tz.setDefault('Asia/Tokyo');
axiosでのエラーハンドリング
これはaxiosに限らずajaxでも同じだけど、
例えば
axios.get('http://localhost:3001/users')

    .then(response => {
        console.log('status:', response.status); // 200
        console.log('body:', response.data);     // response body.

    }).catch(err => {
        console.log('err:', err);
    });
とGet通信した場合にその引数の中身がなんじゃろと思ってたんですよね。Promiseで返ってくればdataってプロパティはありますが そんな事を知らない当時の私。
axiosの場合だけかな?thenの引数は
.then(function(response) {
    console.log(response.data);        // レスポンスデータ
    console.log(response.status);      // ステータスコード
    console.log(response.statusText);  // ステータステキスト
    console.log(response.headers);     // レスポンスヘッダ
    console.log(response.config);      // コンフィグ
  });
と書けて、catchの引数は
.catch(function (error) {
    if (error.response) {
        // The request was made and the server responded with a status code
        // that falls out of the range of 2xx
        console.log(error.response.data);
        console.log(error.response.status);      // 例:400
        console.log(error.response.statusText);  // Bad Request
        console.log(error.response.headers);
    } else if (error.request) {
        // The request was made but no response was received
        // `error.request` is an instance of XMLHttpRequest in the browser and an instance of
        // http.ClientRequest in node.js
        console.log(error.request);
    } else {
        // Something happened in setting up the request that triggered an Error
        console.log('Error', error.message);
    }
    console.log(error.config);
と書ける。そんなメモ。
NestとMongoDB
nestjsで mongoDBを使う場合
"@nestjs/mongoose": "^7.0.4",
"mongoose": "^5.10.1",

"@types/mongoose": "^5.10.3", // --save-dev
が妥当。
mongooseが最新だとエラー。